Building Like (a) Ninja [Pt1]
Take a look at this set of files:
// lib.hpp
#include <iostream>

inline void say_hello() {
    std::cout << "Hello, world!\n";
}
// main.cpp
#include "lib.hpp"

int main() {
    say_hello();
}
Simple enough. Here’s a build script that can compile this program:
g++ main.cpp -o say-hello
Which generates a say-hello executable that prints Hello, world! when it
is run. Simple enough. Why do we need build systems?
That may seem like a silly question, but I’ve seen plenty of people advising
that “build.bat is all you need!”
This is far from the truth. Consider a program with hundreds of source files that builds a dozen libraries and a dozen executables and includes thousands of header files. That shell script would be insane!
Even for just a dozen source files, we’re already in a hole. But why?
With more than one source file, we’re presented with a few problems:
- Run as many tasks in parallel as possible.
- Know what commands to run to produce which outputs.
- Understand the relationship between what a command produces and how other commands use that output as an input.
- Only run commands when their outputs are “out-of-date.” That is: The inputs have changed in a way that could meaningfully change the output. This is also known as “incremental compilation.”
- When compiling C and C++ code, understand that the headers that are
#include‘d by a source file are also inputs to that compilation, even if we don’t list them explicitly. This one is especially tricky. - If we change the command which produces an output, we must re-run the command regardless of whether the inputs have changed.
Any modern build tool should be able to do the above. One such build tool does all of these things with incredible speed, and is the focus of this post: Ninja.
What is Ninja?
Ninja, like its friends CMake and Meson, sits in a strange place. It forms the “bottom half” of a full build system. CMake and Meson can be thought of as the “top half” of a full build system.
Even saying “half” seems generous: It is a tiny yet incredibly powerful tool in the build stack. We can think of the CMake/Ninja and Meson/Ninja pairings as being like the Clang/LLVM pairing. You can think of CMake, Meson, and Clang as all being “high-level” aspects that consume a “high-level” description of their domain, while Ninja and LLVM correspond to the “low-level” of the respective domain. For Clang/LLVM, this domain is C and C++ compilation, for CMake/Ninja and Meson/Ninja, this domain is build systems.
Ninja is closer to GNU Make than any other tool, but you’ll find that Ninja is far simpler than even Make. For this reason, Ninja has quite a few tricks up its sleeves that make it lightning-fast and drop-dead-simple to use.
Like LLVM, Ninja’s input is a very low-level domain-specific language that can be read by human eyes, but no human would want to write by hand.
And writing Ninja files by hand is just what we’re going to do. It’s a great way to learn!
The Point of this Post?
I have found that Ninja’s encoding and representation of the build process is the best fundamental framework when understanding the process of a build system. Not just a build system of C++ either: Any build process can be understood in a similar manner to Ninja’s understanding.
The Dependency Graph
Any build process can be thought of as a mapping of inputs to outputs. This mapping forms a directed graph which must contain no cycles.
The simplest build graph, and the one shown in our initial example, will look like this:

In has two nodes labelled “In” and “Out”, and a single edge E.
Another essential thing to understand is that some attributes of E itself are also “inputs” to generate Out. For example: If E is a compiler command that compiles source file In to object file Out, the compiler flags present in E are relevant to understanding whether Out is “out-of-date.” Adding compiler flags can completely change the result of the build. Rather than splitting these salient attributes of an edge into another input node, we should keep them attached to the edge in order to maintain a consistent model down the road.
Instead of continuing to use abstract terms, I’ll use some actual names we might see in a real project.

Now we say the edge is “compile,” the input is “main.cpp” and the output is “main.obj”
A Bit More Complicated
If you’ve used separate debug information (which I highly recommend), supported by MSVC and GCC, you’ll know that these compile commands produce more than one file as output. Pretty cool.
A naive drawing of such a graph might look like this:
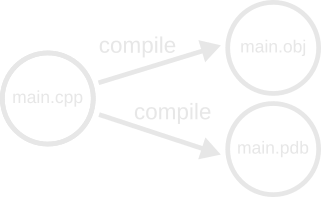
In this graph we have two output nodes: main.obj and main.pdb.
(main.pdb refers to the name of the debug information generated by MSVC
for an object file main.obj.) You’ll also note that we now have two
edges named “compile!” We can’t attach the end of an edge to more than one
node, so we’d have to split it into two separate edges. This conceptual
model is incorrect: We can’t execute these two edges separately, since a
single compile command generates both files. Both files will be re-generated
if we try to generate either of them, so we should keep them attached to the
same producing edge. This requires that we do some rearranging of the graph:
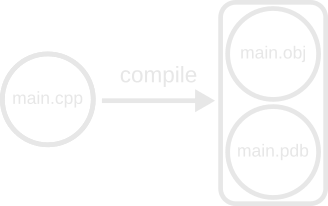
We mustn’t think of an individual file as the output of an edge. Instead, an edge produces an arbitrary number of output files that we group together in nodes of the graph.
Multiple Inputs?
Suppose we are linking an executable that takes an object file an some static library as input. A high-level conceptual graph may look like this:
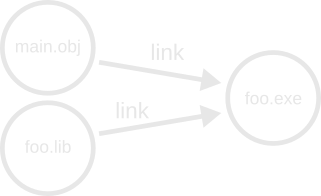
This graph is perfectly valid, but a bit troublesome in the Ninja terminology where an edge corresponds 1:1 with a command to take inputs and produce outputs. In the above, we have two “link” edges that actually represent a single command to execute. How can we solve this?
The answer is to introduce a pair of “virtual” edges that remap the inputs to a single “virtual” node:
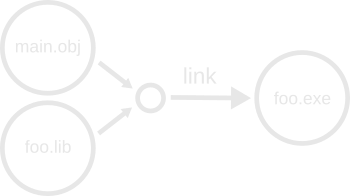
The reason we cannot simply group the input files into a single node like we did with multiple output nodes is that multiple edges may feed into our input set, and a proper subset of our own outputs may be used as inputs to another edge.
We impose a restriction that each “real” node in the graph have at most one inbound edge. The virtual edges and nodes do not correspond to the execution of any actually build task, and only serve as a way to regroup nodes so that we can enforce our “one inbound-edge” rule.
The concept of “virtual” nodes and edges does not appear explicitly in Ninja, but it is a useful mental model for developing an understanding of how Ninja works.
With these things in mind, we’re ready to explore how Ninja builds.
Getting Our Hands Dirty
Ninja exposes a few important concepts. At the forefront are those of rule
and builds. A build corresponds to an edge in our graph, and has some
set of inputs and outputs. Here is an extremely simple Ninja file:
rule simple-cmd
    command = echo "A command was run"
    description = Running a simple command

build foo: simple-cmd
(If you are going to copy-paste, note that Ninja requires a newline at the
end of the file. When you run Ninja, it will look for a build.ninja in the
current directory. You can specify a Ninja file to use with -f <filepath>.)
The rule statement can be thought of as a “template” for a command to run
as part of an edge.
In the above example, I declare a rule simple-cmd, with two variables:
command and description. The command variable tells Ninja a command
that should be executed for any edges using the rule. The description
variables tells Ninja what message to print in the status output while
running the edge.
I have a single build statement. This will create the first edge.
Immediately following the build keyword should be a list of outputs for
the edge. The list of outputs is terminated by a colon :. The first word
after the colon is the name of the rule to use for the edge. In this case, I
am using the simple-cmd rule. The command from the rule will be used when
I evaluate the edge.
Executing the above Ninja file produces the following output:
[1/1] Running a simple comamnd
A command was run
The [1/1] is the number of edges that have been or are currently executing
over the total number of edges that need to be executed. In this case, we
only have a single edge, and it is immediately queued for execution.
The Running a simple command text comes from the description that was
attached to the edge when it evaluated the simple-cmd rule.
The A command was run is the literal output from the command of our edge,
which ran the echo command.
If you run the command several times, you’ll see that Ninja always runs the
command. It’s never marking the output as “done.” This is because the edge
output foo refers to a file that doesn’t exist. As such, the edge is
always considered “out-of-date.” If you create a file named foo in the
same directory and re-run Ninja, you’ll find that it stops running our
command. Ninja detects that foo exists, and that it is newer than all of
its inputs (in this case, there are no inputs to foo, so it is always
up-to-date).
However: If you delete the .ninja_log file that Ninja creates, you will
find that Ninja will run the echo command once again, then stop on
subsequent attempts. Ninja uses the .ninja_log file to determine what
commands were used to create an output. If no .ninja_log exists, it cannot
be sure that the edge command for an existing output is the same as the command
that was used to generate it. For this reason, Ninja will unconditionally run
the command if .ninja_log is missing. Executing the edge will update the
.ninja_log, and the output will again be considered up-to-date. Looking
into the log will show the name of the output, the modification time of the
output, as well as a hash of the command that was used to generate the
output.
You’ll note that Ninja treats our echo command as if it created foo,
even though we created it manually and the echo command had no effect.
This is because Ninja has no way to ensure that the command it runs
generates the outputs we listed on the edge, as the command itself is
completely opaque.
On Unix systems, Ninja executes the command by passing the command string to
a shell as if via /bin/sh -c "<command>" with <command> properly escaped
to be used as a shell string. On Windows, the command is passed to the
CreateProcess Windows API.
The graph for the above Ninja file may look something like this:

The empty circle for the input node represents the lack of inputs to the build edge. The name “simple-cmd” comes from the rule being used to run the edge, and the circle “foo” is the output.
Running Ninja with -t targets prints a list of targets available for
building. There is only one in our Ninja file:
foo: simple-cmd
foo is a target name taken from the name of the output to our single edge,
and simple-cmd refers to the name of the rule used to create it.
A Little More Complicated
Lets create a utility. Here’s a Python script:
import sys
assert len(sys.argv) == 3, 'Wrong number of arguments'
infile = sys.argv[1]
outfile = sys.argv[2]
# Read input lines
with open(infile, 'rb') as fd:
    lines = fd.readlines()
# Sort those lines
lines.sort()
# Write them to a file
with open(outfile, 'wb') as fd:
    for line in lines:
        fd.write(line)
It works very simply: Read the lines of text from a file, sort the lines of
text, and write those sorted lines to another file. We execute it with
python sort-lines.py <infile> <outfile>. Simple.
Let’s use one in our Ninja file:
rule sort-names
    command = python sort-lines.py names.txt sorted-names.txt
    description = Sorting lines in names.txt to sorted-names.txt

build sorted-names.txt: sort-names names.txt
We have a new syntax: In the above example, our build statements names its
outputs sorted-names.txt, a colon :, the rule name sort-names, and
then a list of inputs to the edge names.txt. This should read as “To
build sorted-names.txt, we execute the sort-names rule on names.txt.
If you try to run this Ninja file as-is, you’ll get an immediate error:
ninja: error: 'names.txt', needed by 'sorted-names.txt', missing and no
known rule to make it
Ninja is trying to extract dependency information for our edge, and it
checks if the inputs are “dirty.” Ninja requires that every input either
already exist on the filesystem or be generated by a different build
statement in the Ninja file.
Let’s create a simple list of names:
Bob
Jill
Jane
Jack
Anthony
Samantha
Jimmy
Erica
Eric
Lloyd
Sammy
Taylor
Engelbert
George Washington
Saving it to names.txt and re-running Ninja prints the following:
[1/1] Sorting lines in names.txt to sorted-names.txt
and exits very quickly. We can now see that sorted-names.txt exists on
disk:
Anthony
Bob
Engelbert
Eric
Erica
George Washington
Jack
Jane
Jill
Jimmy
Lloyd
Samantha
Sammy
Taylor
Perfect!
Running Ninja again:
ninja: no work to do.
Ninja detects that the input to our program has not changed relative to the
output, and does not execute our edge again. If we change names.txt, Ninja
will detect this and re-run the sort-lines script to re-generate the
sorted-names.txt file. This is the essence of incremental builds.
One build edge is simple enough, but suppose we want now to sort also a list of baking ingredients:
rule sort-names
    command = python sort-lines.py names.txt sorted-names.txt
    description = Sorting lines in names.txt to sorted-names.txt

rule sort-ingredients
    command = python sort-lines.py ingredients.txt sorted-ingredients.txt
    description = Sorting lines in ingredients.txt to sorted-ingredients.txt

build sorted-names.txt: sort-names names.txt
build sorted-ingredients.txt: sort-ingredients ingredients.txt
After creating an arbitrary ingredients.txt, we see that Ninja will
happily sort our ingredients to sorted-ingredients.txt. If we change both
names.txt and ingredients.txt, Ninja will even run the two commands in
parallel. This is the essence of parallel builds.
Our dependency graph may look like this:
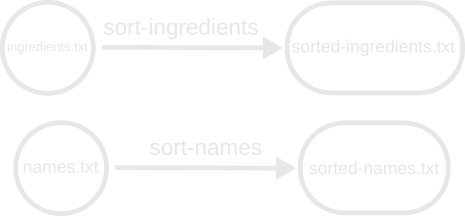
(I’ve replaced the circles with rounded capsules to fit larger text in them.)
This is actually two disconnected graphs, but when we build we can imagine a
“virtual” node to build that depends on all the targets requested to build. When
no targets are listed on the command line (and no default targets are named),
Ninja behaves as if all leaf output nodes are requested to build. Such a
conceptual graph will look like this:
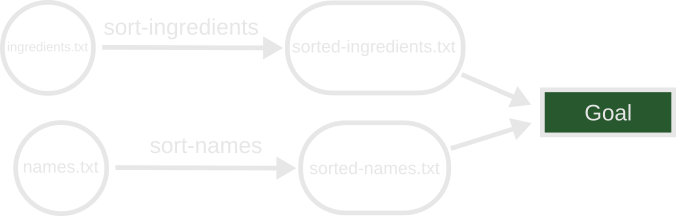
This special Goal node is where we start when investigating the targets to
build. It is not specified in our graph definition: We add it and create virtual
edges running to it from the nodes of the outputs that we want to generate. From
a user interface or API, the invoker may request some subset of all nodes that
they wish to build. The Goal may even specify nodes which have outbound edges
(Non-leaf nodes).
Less Redundancy
Our Ninja file sure seems pretty wordy, doesn’t it? We have two rules for two build edges that look almost identical. That’s annoying. Fortunately, Ninja allows us to consolidate them using variables:
rule sort-lines
    command = python sort-lines.py $in $out
    description = Sorting lines in $in to $out

build sorted-names.txt: sort-lines names.txt
build sorted-ingredients.txt: sort-lines ingredients.txt
Now both build statements use a single sort-lines rule. When a rule is
expanded for a build edge, Ninja defines two variables $in and $out as
the explicit inputs and explicit outputs of the edge respectively (we’ll get
to what “explicit” means later).
When creating the edge for sorted-names.txt, the command for the edge
will expand $in to names.txt and it will expand $out to
sorted-names.txt. A similar expansion will occur in the description
variable for the rule.
This variable expansion allows us to reuse rules in many edges for concise
and understandable rules and build statements.
“Implicit” Inputs
Suppose we want to change our sort to be descending instead? I’ll tweak
lines.sort() to lines.sort(reverse=True) in sort-lines.py. Should work,
right? Let’s run Ninja again:
ninja: no work to do.
Oh no! What’s happened?
The simple answer is that Ninja doesn’t know that changes to
sort-lines.py affects the output. We need to add it as an input to the
edges:
rule sort-lines
    command = python sort-lines.py $in $out
    description = Sorting lines in $in to $out

build sorted-names.txt: sort-lines names.txt sort-lines.py
build sorted-ingredients.txt: sort-lines ingredients.txt sort-lines.py
Not so fast! Running Ninja now produces errors:
[2/2] Sorting lines in names.txt sort-lines.py to sorted-names.txt
FAILED: sorted-names.txt
python sort-lines.py names.txt sort-lines.py sorted-names.txt
Traceback (most recent call last):
  File "sort-lines.py", line 2, in <module>
    assert len(sys.argv) == 3, 'Wrong number of arguments'
AssertionError: Wrong number of arguments
ninja: build stopped: subcommand failed.
After the FAILED: line, Ninja prints the exact command it attempted to
execute:
python sort-lines.py names.txt sort-lines.py sorted-names.txt
This is not what we want: Ninja is passing three arguments to the script,
but the script wants two. The extra argument is sort-lines.py where we
expect to see the output. Instead, the output argument is passed as the
third argument. What’s going on?
Remember $in? Well, it evaluates to the explicit edge inputs, and we just
added sort-lines.py to those inputs. Ninja designates “explicit” inputs as
those that explicitly appear as arguments to the command to build the
output. We want sort-lines.py to be an input, but we don’t want it to be
added as an input to the command arguments itself. This is an “implicit”
input. They appear in the build statement after the regular inputs,
separated by a vertical bar |:
rule sort-lines
    command = python sort-lines.py $in $out
    description = Sorting lines in $in to $out

build sorted-names.txt: sort-lines names.txt | sort-lines.py
build sorted-ingredients.txt: sort-lines ingredients.txt | sort-lines.py
The only differences between implicit and explicit inputs is that
explicit inputs will appear in the expansion of the $in variable.
Ninja also has a concept of implicit and explicit outputs, which work in a similar fashion: implicit outputs do not appear in expansion of the
$outvariable.
Now that we’ve added another input, our build graph has changed. We have two
edges which use sort-lines.py as inputs, and we don’t want to generate two
different nodes. We’ll add another node and create a virtual grouping node for
the sort-lines edges:
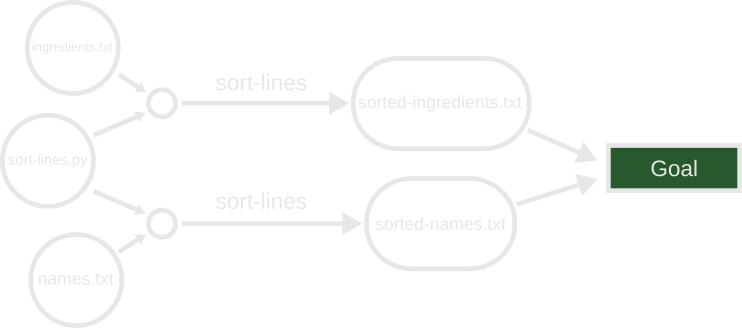
The distinction between implicit and explicit inputs is not important for building and traversing the build graph. There is a third type of input known as order-only, which does change the way we view and traverse the build graph.
Even Less Redundancy
Our Ninja file is already fairly terse, but we’re repeating the name
sort-lines.py in several places. If we update it in one location, we have
to update it in multiple places. That’s annoying. Luckily, Ninja lets us
also declare variables outside of rule or build statements:
# The name of the line sorting script
sort_lines_py = sort-lines.py

rule sort-lines
    command = python $sort_lines_py $in $out
    description = Sorting lines in $in to $out

build sorted-names.txt: sort-lines names.txt | $sort_lines_py
build sorted-ingredients.txt: sort-lines ingredients.txt | $sort_lines_py
Now, updating the path to the sort-lines script only needs to update the
sort_lines_py variable at the global scope, and the changes will propagate
through the whole file.
Configuring Rules
We have our sort script that sorts lines in descending order, but what if we
want some files to be ascending and others to be descending? Well, let’s
first tweak sort-lines.py to accept another asc or desc argument to
determine the sort order. I’ll change the expected argument count from 3
to 4, and I’ll tweak the sort call like this:
lines.sort(reverse={'asc': False, 'desc': True}[sys.argv[3]])
When the third argument is asc, it will do a regular ascending sort. When
it is desc, it will do a descending sort. Anything else will cause an
error.
How do we use this in our Ninja file? We could declare two
sort-lines-asc and sort-lines-desc rules, but that feels very wasteful.
We should be able to configure this without so much verbosity. What does
that look like? Well, we take advantage of Ninja variables again. We can
provide additional variables in a build statement to be expanded in a
rule. It looks like this:
# The name of the line sorting script
sort_lines_py = sort-lines.py

rule sort-lines
    command = python $sort_lines_py $in $out $sort
    description = Sorting lines in $in to $out

build sorted-names.txt: sort-lines names.txt | $sort_lines_py
    sort = asc

build sorted-ingredients.txt: sort-lines ingredients.txt | $sort_lines_py
    sort = desc
The indented area below a build statement lets us provide those additional
variables that will be included when evaluating the rule. We tweak our
sort-lines rule to use the $sort variable as the sort-order argument,
and we’ll expect build statements using the rule to provide it in their
variable list. If a build omits the sort variable, the command will fail
as the script expects this argument. There is no way (at time of writing) to
specify the “default” value for a variable in a rule. Remember: Ninja is
extremely bare-bones. It is intended that a tool will be generating these
Ninja files.
Note: The $sort variable isn’t a variable that Ninja recognizes in any
special fashion: It’s a regular user-provided variable, just like
$sort_lines_py. The usage of $sort in the rule will expand to the value of
$sort that it obtains from an edge that uses the rule.
The variables have no effect on the build graph.
To Be Continued…
There’s still quite a bit more to cover, including how we execute the build graph and the essential concept of “implicit dependencies” (distinct from implicit inputs!). I intended to keep this all in a single post, but it’s already growing fairly long.
Stay tuned for Part 2…